
© Kelly Cole 2011

In picture to the left, this is the finished look of the CSLQ. I call it boxed-in because of all the squares and geometric shapes it makes - which goes really well with the squares in the concrete cabin.
Below is a diagram for the over-all movement when quilting. Start at the upper left corner and make your way down and around each block and then each row.

You will need to start:
- 1 concrete cabin quilt top measuring 44" x 69" approx.
- 1 piece of batting measuring 6 inches larger than finished quilt top ex. 50"x75"
- (I use an 80/20 cotton poly blend)
- 1 piece of backing measuring 6 inches larger than finished quilt top ex. 50"x75"
- Spray adhesive -- So much easier than using safety pins. I only recently started using 505 fix spray and it has improved my end results and given me less frustration than safety pins. I strongly urge you to splurge on a can and see what you think.
- 2 bobbins wound with 40 weight thread in color of your choice*
- 1 spool of 40 weight thread
- Walking foot (recommended, but not completely necessary) with straight line guide attached

Begin with your quilt all sandwiched together and placed at the top left corner in the sewing machine like the picture shown at right. For instructions on doing this check out Quilting the Quilt, Part 1.
But before we start sewing our first line we need to secure the ends, like we do when free-motion quilting. Bringing the bobbin thread up and tying a knot with the top thread gives a nice clean starting and ending point that blends into the quilt and becomes unnoticeable when completed. You will need to do this each time you start a line or bobbin, which is only twice for this quilt. So let's show some pictures on how to do this, I made the thread and needle stand out more by painting over them, they look a little silly but I think it helps to show the process.
 |
Start by turning the hand crank once so the top thread goes down below to catch the bobbin thread. |
 |
Next pull up on top thread and wiggle out the bobbin thread to the surface. |
 |
Bobbin thread is pulled up! Now pull bobbin thread all the way up so that there is a loose end |
 |
Both top and bobbin thread are pulled up. We are ready to start sewing! |
 |
Mapping out my next move. |
This quilting technique is completely made up as you go, I did not use a pattern to tell me when to turn or how long to make each line -- but I did follow some guidelines as I went. For each quilt block I made sure to cover the area leaving 2" - 4" between each line. Sometimes that meant making a big boxed-in CSLQ, other times it meant I had to make a small boxed-in CSLQ. But with each turn I mapped out in my head where my next couple of turns and lines were going to be (see picture at left). I also made sure to go around the block in the sashing so that those areas were secured too.
The quilt block itself made a handy guide and I kept my line close to the edges of the squares or right outside them. I also used a straight line guide attached to my walking foot to keep the lines as straight as possible, but there are crooked lines - and that's okay!
*Let's stop a minute to talk about thread choice. I used white thread because I wanted the thread to blend into the sashing and the back of the quilt. For your quilt use a color that will achieve your desired look.
Below is another quilting diagram. The red shows where I have already quilted starting from the top right and making several turns before I am in the middle of the block ready to make my next move. I can see that there is a pretty big space that needs a boxed-in CSLQ and I have to plan for moving to the next block. So this is my solution which gets pretty close to another line but that's okay. There are no quilt police around to harass you!
 |
Planning out where to stitch next |
Next let's talk about turns. There is a lot of turning going on in this quilt. I'll be honest, it gets kinda frustrating at times, especially when doing the smaller square boxed-in CSLQ. So let me give you a few tips that helped me. When getting ready to turn have your needle and presser foot in the down position. Doing this gives stability to the needle which is being pulled on from the parts of the quilt draping down when wrangling the quilt through the throat space. It looks messy but works well (see photo below).
 |
Needle and foot in the down position on those turns |
The number one way to mess up on this quilting method is in these turns. With each turn comes the chance to foul up the thread tension and that is the biggest cause of messy stitches. But there is hope because the fix is really easy, be careful and mindful when turning the quilt so as not to get the quilt mixed up with the thread.
 |
Quilt wrangling:; in the tension danger zone |
Once the quilt is through the throat of the sewing machine do a double check on the thread making sure it's taught across the back and threaded properly through the rest. If it's not proper put the thread right and turn the hand wheel once or twice. Now you should be all set to continue continuous straight line quilting over all blocks and sashing until you run out of bobbin. When that happens it is time to secure the threads.

This is easy to do but a little tedious. Start by taking a seam ripper and gently pulling out the stitches without breaking the thread. Take out enough stitches so that there is enough thread to tie a double knot. Once the thread is knotted and trimmed start a new line of CSLQ by the same method described above. Below is a nice picture of what it looks like when your next bobbin is all ready to go. Finish CSLQ for the rest of the blocks and then secure both starting points and the second end by double knotting the loose threads.

Hooray! You are done quilting your quilt! Maybe it's a concrete cabin like mine in the picture below, or maybe it's something great I don't even know about! : )
 |
Close up of the quilting, looks good! |
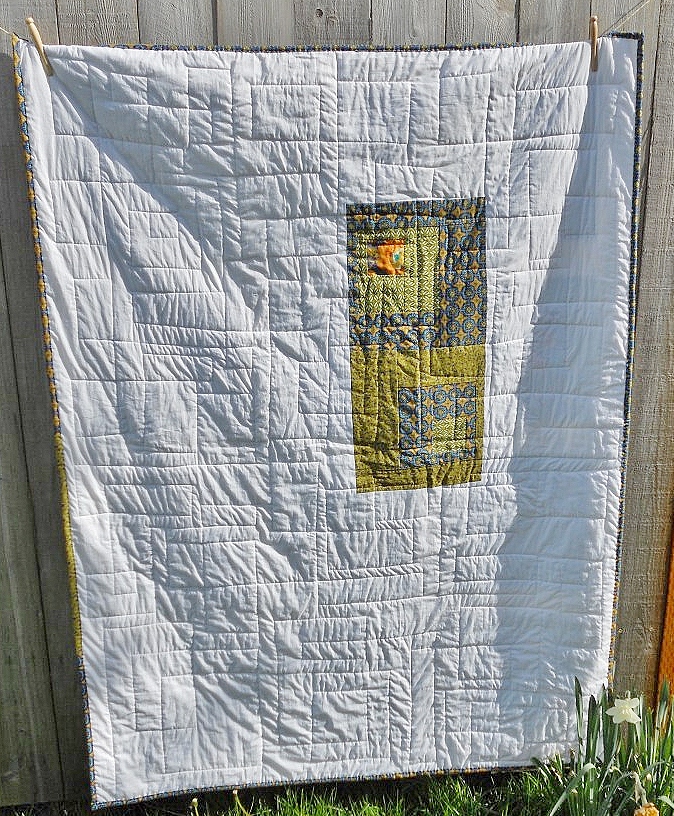 |
The back really shows off the boxed-in look |
 |
All done! |
Once again I hope you enjoyed this tutorial and most importantly that you found it useful! I am a visual learner and really need pictures to tell the story and refer to when making something --- if I can see the steps I can do the process.
This tutorial is one of five in a Concrete Cabin Quilt Tutorial Series
Find the other tutorials by their links:
Cheers,
Kelly
